Wednesday, July 4, 2018

Angle Demonstration

Patty paper has so many uses. One of the very first lessons in Geometry is a reminder of the different types of angles along with the definition of an angle. In the top left corner of the picture above, you can see that two rays are drawn on two pieces of patty paper. One ray is called CA and the other ray is called CB. The students can clearly see the definition of angle when you do this. When  you put the two rays together at point C, you've created an angle. From here, I get the students to make the different types of angles: right, obtuse, acute and straight. Finally, I get them to tape the acute one in their interactive journal. This is great for all ages and it gets the point across!

This lesson is a part of my Point, Line, Plane lesson that you can find in my store. All my Geometry lessons are in my Geometry Curriculum. You can see both resources below. Check them out!!!

Geometry Curriculum

Intro to Geometry

Tuesday, June 26, 2018

The Angel and the Cowboy - Working with Inequalities


I came across the Angel and the Cowboy years ago. I did not create this, but I did add the bow tie. I love using this with inequalities. I have found it most useful when working with piecewise functions. The idea is that the hats and the face deal with graphing, the body is used for writing domain and range in interval notation form and the legs help with writing inequalities. All the pieces are related. Notice how all the Angel symbols are for NOT EQUAL and the Cowboy symbols are when things are EQUAL.

I found this slide from when I taught piecewise functions last year:
Let's break this idea down a little further. If you asked your students to give the domain of only the left arrow, then they would see an open circle which is the angels face, so I call this an angel problem. The student would notice that the domain goes from negative infinity to -1. If you want the students to write this in inequality form, they would use the angel symbol and say: x < -1 or I allow my students to write: -∞ < x < -1. If you asked them to write the domain in interval notation form, they would write (-∞,-1). All symbols came from the angel!

Now let's look at the right arrow. This is a cowboy problem (well not completely). The enclosed dot indicates that the problem is a cowboy problem, but since there is an arrow on the opposite end which represents going to infinity, this problem is also an angel problem. The domain in inequality form would be x > -1 or -1 < x < ∞.  In interval notation you would write [-1, ∞). The second inequality answer and the interval notation answer contain both cowboy and angel parts. (Since you can never reach infinity, you can never equal infinity. That's why I added the infinity symbol to the angel.)

Anytime graphing and writing inequalities is a part of a lesson the angel and cowboy can be useful. You may not need all the parts of the angel and cowboy. Interval notation is not taught until Algebra II in Texas, so when I'm using this in Algebra I, I usually just tell the kids that they will learn about the rest of the symbols later.

The solid and the dotted lines above the faces come in handy when graphing inequalities. If we are graphing y > 2x - 3, then the students will realize that the symbol came from the angel, so the line will need to be dotted. The one thing that the angel and cowboy do not help with is shading above or below the line. You could easily add the words above and below to the symbols on the legs if you wanted.

I'd love to hear from other teachers that have used this before. Let me know how you use it or how you have tweaked it. If you've never seen this before, I hope you will find this handy and you will be able to use it in your own classroom!

I've made a free poster of the angel and cowboy that is in my TpT store. If you are interested, please use this link and download this resource.     Cowboy and Angel Poster

Sunday, June 10, 2018

In Algebra II, it's hard to decide how to start the year. I want to review, but I don't want to keep us from moving forward. I need to know how much the students remember from Algebra I. My students were in Geometry last year. How much Algebra was incorporated into their Geometry class? I feel like my best bet is to begin by solving equations and inequalities. The activity that I will use, starts easy and gets progressively harder. The students will not be able to use a calculator because I need to know who REALLY knows how to solve equations without tricks or help. This activity is sold in my TpT Store:

 Solving Equations and Inequalities
Solving Equations and Inequalities

I really like this activity because there are options. I can make it fun by using the answer banks. The answer banks have the answers with an activity. A few of the activities have the students draw a picture. Another activity has the students fill in a movie title. There are progress checks along the way as well. I think that I will use the easiest page as a bellringer on the first day of class. I'll have them work through as much as they can on the rest and send it home to be finished. I can use the progress checks as quizzes or as pages for their interactive notebooks. This resource will give me an idea of where the students are and will be a nice segway into solving absolute value equations which is what I plan on doing next.

Saturday, March 3, 2018

Find what you AREN'T look for first!

I like to challenge my students. One way that I like to challenge them is through tricky diagrams and pictures. I don't want every problem to be straight forward. I always tell my math students that sometimes you must find something you aren't looking for in order to find what you ARE looking for. Since I teach 9th graders, I'm trying to get them out of the mode of thinking that all problems should be easy to figure out. I love watching them really think, but it tends to be frustrating when you have those students that want to ask you about every single problem or want you to stand at their desk and watch them so they can ask you questions. I've learned to give them a good 5 to 10 minutes of independent thinking time, then I'll let them compare what they have so far with a partner. I'll watch and listen to the conversations to gauge what to do next. If they are still struggling, I may give them a hint. Sometimes I'll play the game where the only answers that I can give are yes or no. This will help them learn to ask good questions. Below are some examples of the types of problems that I'm talking about. If students get used to doing these types of problems, they will be excellent problem solvers and even though a problem may stump them, they will have the experience to know that if they stay after it, they can eventually figure it out. 

This problem is from my Law of Sines and Cosines Resource. 

I call this one, the Poodle Problem. It is in my Trig Unit

This problem is from my Special Right Triangle Unit. 

The great thing about these problems is I've made them easy to grade. You know real quick if they've worked the problem correctly or not. 

After a year of these types of problems, I'm hoping to see improvement in my student's college entrance scores and EOC scores. I know that this will also help with their growth mindsets. I feel like this is definitely a win/win!


Wednesday, February 7, 2018

Real-life Examples of Solids of Revolution and Cross-Sections

I get so much out of creating lessons. When you deeply understand a concept, you can talk about real-life situations and the math behind it. I've never thought about it until now, but a revolving door is a perfect example of a solid of revolution. Taking a rectangle and revolving it around a pole, creates a cylinder. What a beautiful example!


The last time I was at an AP Calculus seminar, I learned that another awesome example of a solid of revolution is a honeycomb decoration used at parties. These are perfect examples because you can see the 2-D version before it is rotated. This is exactly what we want students to know. What does the 2-D version become with you rotate it? If they can visualize that, then they get it!


Another concept that goes hand-in-hand with 3-D figures is the idea of cross-sections. Everytime we slice an orange, apple, or a loaf of bread, we have created a cross-section. In Algebra 2 and Pre-Calculus, we discuss cross-sections of cones. Depending on how you slice the cone, you can get a circle, an ellipse, a parabola or a hyperbola. 


A great hands-on activity for cross sections is to have the students create a shape out of play-doh. Take a piece of dental floss and slice the object horizontally, vertically or even at an angle. Be sure and have them make predictions before they perform the experiment! Students with phones can take a before and after picture so that other students can see. 


I enjoyed creating my Intro to 3-D Figures resource. It's amazing how after teaching math for many years, that I can still pick up valuable insights and ideas. Math is infinite. There is no end to what you can learn! 

 Intro to 3-D Figures


Wednesday, January 24, 2018

Are Seating Charts Really Necessary?

Do you want your students to be focused? Do you want to keep your students on their toes? Are your students not performing as expected? Seating charts might the answer!

On the first day of school, I put the students in alphabetical order and keep them there for the first six weeks. This helps me learn names quickly. It also helps me learn who not to sit together in the next seating chart. In the first six weeks you will also learn who is quiet, who is loud, who can't see very well, who is unorganized, who needs special help...the list goes on. My second six weeks has started and I will concentrate on partner work this six weeks. I have my desks in rows still but now I have 8 rows with

4 seats. Yes it's crowded. I pair students up like this:
slide1

If I have an extra student, then he/she will pair up with the group in front or behind. When pairing students, I used my first 6 weeks grades. I tried to put a low with a high. I also have a few students with special needs, so I strategically placed them. I have one student that brings a huge backpack everyday. I put him on the far left, so he has plenty of room to spread out. Anyone that failed the first six weeks, is now right by my desk or at least in the front row so I can keep an eye on them.
It really bothers me when the desks don't stay where I put them, so I put tape on the floor and the front person knows that at the end of class to make sure that's where their desk goes and the whole row will follow suit.

Is this time consuming? Only on the front end. It is worth it though. I also like to label each row as an "A" or "B". I will say things like, "A, you will tell your partner what the definition of perpendicular is and B you will tell your partner what parallel is." I try as often as possible to have them speak the language of my class to each other.

Seating makes a difference. If students know you don't care where they sit, it becomes a free for all. I've become a control freak over the years but it is only because I've been the teacher that let's their students sit where they want, listen to their ipods, bring in food and so forth and guess what? It turned out to be horrible. My students were too comfortable and not ready to learn. I've changed and I've seen a big change in how my students perform. You will too when you gain control.

Friday, January 19, 2018

Area of Polygons

Area is taught in early grades. The concept of adding up all the square units that COVER a figure is actually pretty simple. Students need to understand WHAT area is before really delving into using the formulas and then taking them a step forward.

In secondary grades, we begin to use the formulas and study how areas of composite figures can be found as well as finding shaded areas. These types of problems bring in the "real-life" and "problem solving" component. I tell my students all the time, "You must know how to apply the problem and you must know how to think about it forwards and backwards." (If you are given the sides, find the area. If you are given the area and one side, find the missing side.)

To take area a notch further, we throw in algebra. Instead of a side being just 4, we might make it 4x. We will talk about how area is quadratic, volume is cubic and perimeter is linear.
Before students get to pre-calculus, they also need to how dimensional changes affect the area. If all dimensions change, the area changes by that amount squared! So if all sides are doubled, then the new area will be quadrupled (or doubled squared). If one dimension changes, then the area is only affected by that amount!

I've been hard at work creating my Geometry Curriculum. My most recent resource covers area. The resource practices finding area of rectangles, parallelograms, squares, rhombi, triangles, and trapezoids. These figures are combined into composite figures and problems are worked forward and backwards. There is a special emphasis on regular polygons. Regular polygons are a great way to practice special right triangle rules and trig! There are tons of notes, practice and quizzes in this resource. If you need something like this, then go to my TpT store and check it out.

Slide1
Find this in my store! Click Below↓

Area of Polygons!

Sunday, January 7, 2018

Fibonacci Sequence


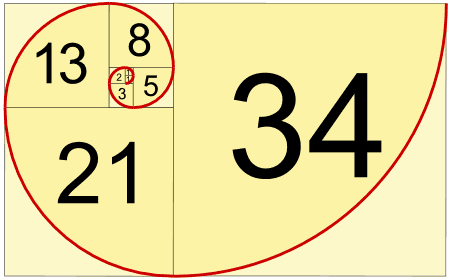
 A pattern that occurs over and over in nature is the Fibonacci Sequence. The pattern is this: 1,1,2,3,5,8,13,21,34,55... Do you know the next number in the pattern?
 Image result
When you make squares with those widths, you get this cool spiral:Fibonacci Spiral

Look at these beautiful images that follow this pattern:


Messier 83, a spiral galaxy located 15 million light-years away from Earth.


Image result for fibonacci in human body

Image result for fibonacci in nature flowers

A spider form formed using a spiral shape.

Image result for fibonacci in nature flowers

Image result for fibonacci in nature flowers

The pattern does not always appear in a spiral.
The Golden Ratio and Fibonacci Sequence go hand in hand...pardon the pun.


Image result for fibonacci in human body


Divide 8 by 5, Divide 21 by 8, Divide 55 by 34... choose any two numbers in the sequence that are next to each other and divide larger by smaller. 

Friday, January 5, 2018

Why Are Literal Equations So Hard?

Parks and Rec has to be one of my favorite shows and Rob Lowe is very cute, STILL! If you've never seen the show, put this on your to-do list! You'll think it's weird at first but the characters are hilarious. Rob Lowe joins the show during the second season. He literally says literally 20 times a show...maybe I'm exaggerating, but he does say literally a lot! Watch it...you'll love it. It's a nice way to relax and get your mind off school.
So why am I thinking about literal equations? The physics teacher is telling me that the kids can't solve literal equations! I could have told him that :), but why can't they? I know my students can solve 4x = 8, but they can't solve d = rt for r. What's the issue? I think it's several things:
  1. They are solving 4x = 8 in their head. They know that 4 times 2 is 8, so x has to be 2. They aren't thinking about inverse operations. I'm realizing some students still do not know that 4x means 4 times x.
  2. When students see a problem with only letters in it, they automatically think that it's hard. They are not making the connection that really all that is happening is that r is multiplied by t. If they knew the operation taking place in the problem, then they should ask what is the inverse operation.
  3. Students are not understanding that all they are really "UNDOING" the operations to solve for one of the variables...which leads me to wonder if anyone has ever explained that when you solve equations, you are actually doing PEMDAS backwards.

I've created a lesson that addresses all three of the issues above. At first, I think the student should analyze the problem by writing the equation in words so I can see if they understand what operations are taking place. I then ask them to circle the variable they are solving for so they can have a visual of what needs to be by itself. The notes below are what I give the students to get them started on this process.
literal-equation-explained
I take them through a problem similar to the one above and then I let them practice 4 problems that are similar to this. Below is a sample:
literal-eq-with-words
If you like collaboration, these problems would be good for a sage and scribe activity. The sage tells the scribe what to write. The scribe has to stay quiet for a while and let the sage describe the steps and what needs to be written. I eventually let the scribe have some input because sometimes they are dying to help the sage. We switch roles for each problem.
Next, I give them a worksheet that has a regular equation with a literal equation that looks just like it. They do the regular one first and then the literal equation (they are solving for c). I keep telling them to remember what they did on the regular equation and follow those same steps. Here's an example:
comparison-of-equations
The final activity in this lesson is to help the students in their science class. I give them some science equations mixed in with a few math equations. I'm hoping by now, these problems will be easy.
science-lit-equ
There is one more reason students do not understand literal equations and it's our fault as teachers.

4. Teachers work on literal equations for one day maybe two and that's it. How can they really get it?

Let's not make that same mistake again. I plan on recycling literal equations back into my lessons. I plan on using them in bell-ringers and I plan on putting them on assignments and tests in the future. How many people can understand something, especially in math, after one or two days? Remember that when a student first sees a literal equation, it looks foreign to them. They are not going to make the connection that they are just equations (at first).
We can help make the student more successful in math and science if they learn to solve literal equations. Don't take this topic lightly. Ask your science teachers what else students have a hard time with when it comes to math in their class. Bring something to write with, because you'll get a list of items. Other things that my physics teacher has mentioned is conversions, graphing linear equations (knowing slope, independent and dependent) as well as being able to graph bar graphs.
Good luck and if you would like to purchase my literal equations activity, click below:
literal-equations-pic

Thursday, January 4, 2018

You Have TI-Nspires...Now What?

TI-Nspires are amazing calculators. I'm still learning how to use them. There are so many features, don't try to learn them all at once. First of all, get the teacher software! I can't live without it. In my district, even the students have the software available on their laptops. It's wonderful.
How do you get started? The first thing I learned was go to the HOME SCREEN and choose NEW DOCUMENT. If there is a screen that asks if you want to save, say no. Now choose what you want to do. If you are learning, you will only choose graph or calculator. This is what I still choose most of the time!
new-doc-screen  choice-screen
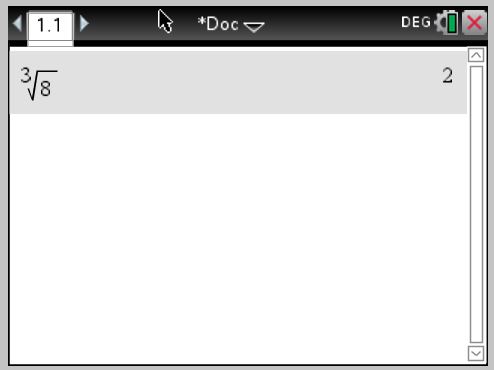
The calculator screen is easy to use. If you are looking for something specific it is probably here: (see below) I used this button to type in a cube root as seen in the next pic.
special-characters  calculator-screen
Let's say you now want to graph something. You have a choice. Start completely over and go to the home button and go through the same steps explained above, or add a page to your document. Let's add a page. Simply click CTRL (blue button) +Page (doc button below home.)
add-a-page   graphing-1
Choose Graph! Now you can type an equation. The x button is one of the white alphabet buttons at the bottom of the calculator. Hit enter when you are ready to graph. To graph a second equation, click the tab button and type in a new graph... or to change the first equation, after clicking tab, up arrow to the original equation. If you know this much, you are ready to use the calculator. The only other things that are nice to know at this stage is that ctrl t will pull up a table (and ctrl t will take the table off).
table
AND the menu button has many things that will help you. I suggest clicking the menu button and checking it out! I use #4 and #6 daily. #6 is where intersections and zeros are and #4 of course helps you change the window settings like on the 84+.
menu
My goal was to help you get started. If you will start using these features and become very familiar with the calculator, you will discover new things on your own. Your students will also help you discover things. The main thing is to get started! Don't let those calculators just sit. They are really awesome and helpful!

Monday, January 1, 2018

Exponential Functions - Get Your Free Exponential Task Cards Here!

 Exponential Function Activity


This was my very first resource that I put on TpT. I love this activity. It gives the students choices and it's hands-on. Students love making a poster and using multiple representations. Here's a sample poster:


Creating this activity inspired me to create Exponential Functions: 6 Stations. More examples of Exponentials! Fun and interactive! This resource is creative and the students will enjoy all of the real-life exponential functions that they encounter! For instance, have you ever heard of the Tower of Hanoi? It is a very cool activity that if done correctly has a pattern.
 Exponential Function Stations


Here are three more awesome Exponential Function Resources that are in my store. The
Exponential Functions Assessment has 5 versions of the same exponential function assessment. These assessments come in different difficulty levels which is good for differentiation. The Exponential Functions Unit contains practice, the exponential function assessments previously mentioned and warm-ups. The Exponential Functions Bundle has all of my exponential function resources plus some exponential function task cards.

 Assessment Unit
 Bundle

 Thanks for visiting my blog. Download your free 

exponential task cards here!


5 Ways to Gain Control of Your Classroom!

Patty paper has so many uses. One of the very first lessons in Geometry is a reminder of the different types of angles along with the defi...